Use Chrome Tab Groups to Reduce the Size of the Haystack

Don’t you hate it when your Chrome browser has 1,000 open tabs and you can’t find / remember which one was what you were just looking at a few minutes ago? It’s easier to find a needle in a haystack!

One way to make tabs easier to find is to organize them using Chrome Tab Groups.

Chrome allows you to create these tab groups and move your tabs in and out of them. Here’s an example of some tab groups in action:

The colored tabs with AWS, Jenkins, Confluence, Github, and Jira were created by me, then I moved the appropriate browser tabs into each group. This has made finding tabs so much easier!

To get started, right click on any tab and choose Add Tab to Group → New Group:

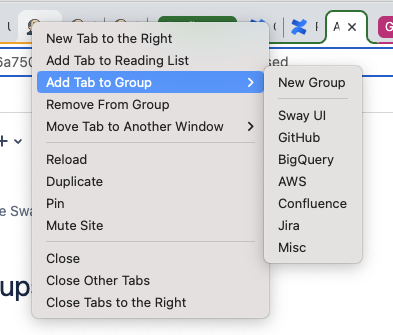
As you can see from the image, you can also use this method to move a tab to an existing group.

And, of course, you can drag and drop tabs into and out of existing tab groups.

Whew!

Fix AWS Session Manager Can’t Connect Permissions

One of our users wanted to be able to access the shell prompt on a specialized AMI instance that he had spun up. He had ssh access via ssh key, but using EC2 → Instances → Specific Instance → Connect to instance was not working for either EC2 Instance Connect or Session Manager.

I was able to diagnose this particular failure as a simple permissions issue on his EC2’s instance role. Lucky for me, EC2 Instance Connect worked with my admin user privs. But I could have used ssh with his ssh key.

Steps:

  1. Verify that the SSM Agent is running on the EC2. In this case, the user had created an EC2 instance running Ubuntu 20.4, requiring the use of snap. Other Linux versions may require a different command.
    • sudo snap list amazon-ssm-agent
      • Name Version Rev Tracking Publisher Notes
        amazon-ssm-agent 3.2.419.0 6783 latest/stable/… aws✓ classic
    • The output in my case indicated that the agent was installed. I could move on to the next step.
    • If your output indicates that the agent isn’t installed, you’ll need to install it.
  2. Cat the SSM agent log
    • sudo more /var/log/amazon/ssm/amazon-ssm-agent.log
    • The output in my case included:
      • User: arn:aws:sts::123456789:assumed-role/ecsInstanceRole/i-123402283adf2501 192 is not authorized to perform: ssm:UpdateInstanceInformation on resource...
  3. Open IAM → Roles and find the assumed-role name
  4. Add the AmazonSSMManagedInstanceCore policy which includes the required "ssm:UpdateInstanceInformation" permission.
  5. Try Session Manager again.

Adding Users to Manage Kubernetes Cluster on AWS EKS

AWS EKS support for kubernetes has some quirks. The most-troublesome one is the fact that only the entity that creates a cluster can manage it. For example, if Amir creates a cluster using his AWS IAM credentials and promptly resigns, no one else in your company can manage that cluster. Even AWS support will not be able to delete it – or so they told me.

The simplest method I have found for making a cluster manageable by others is to edit the aws-auth config map for the cluster. You can add individual users and roles to the system:masters group for the cluster. (I am partial to adding roles and then managing role membership as a way to control who can access the cluster…)

Pulling together advice from a few web sites, this is the summary of what I am doing:

Prerequisites

  • AWS CLI
  • Kubectl
  • Eksctl
  • Default editor configured on your shell

Steps

  • Ensure that you are using the proper identity and AWS credentials
  1. Use aws sts get-caller-identity to ensure that you are using the proper credentials
  2. You can change credentials using aws configure
  3. Use eksctl utils write-kubeconfig --cluster <cluster-name> to configure your kubeconfig for the cluster you want to add users to.
  4. Use kubectl edit configmap aws-auth --namespace kube-system to modify the aws-auth ConfigMap for the cluster. Your default editor will open. On a brand-new cluster, the mapUsers section of the file will be empty. Add users following the YAML format shown in the mapUsers section, below, as a guide. Or add a role to the mapRoles section.

    You should not edit any other part of the file – in fact, we are warned that messing up this file can lead to everyone being locked out of the cluster. Proceed with caution. the values shown, below, are for example purposes only. DO NOT COPY THEM.

    apiVersion: v1
    data:
    mapRoles: |
    - groups:
    - system:bootstrappers
    - system:nodes
    rolearn: arn:aws:iam::nnnnnnnnnnnn:role/cluster-name-nodegroup-ng-NodeInstanceRole-BL7FPEHQ
    username: system:node:{{EC2PrivateDNSName}}
    mapUsers: |
    - userarn: arn:aws:iam::nnnnnnnn:user/user.name
    username: user.name
    groups:
    - system:masters
    - userarn: arn:aws:iam::nnnnnnnn:user/user.name2
    username: user.name2
    groups:
    - system:masters
    kind: ConfigMap
    metadata:
    creationTimestamp: "2022-11-24T22:07:34Z"
    name: aws-auth
    namespace: kube-system
    resourceVersion: "1577569"
    uid: 123456-e129-4fe0-9ecb-246425fba343

     
  5. Save the file. kubectl will take care of updating the cluster. It may take a minute or two, but eventually the users /roles you added will be able to manage the cluster.

Revert tar.gz Bucket Objects in AWS S3

Good news: One can enable versioning on Amazon AWS S3 buckets!

Not so good news: AWS Console offers no direct, easy way to revert an object to a previous version.

Work around: Download the old version and upload it back.

Sounds simple. Unless, as in my case, the ‘object’ was actually a tar.gz archive.

Here’s what happened: Using the AWS Console and the aws s3 cli, the downloaded file lost the gz extension. my_file.tar.gz ended up on disk as my_file.tar. Hmmm.

Workaround: Use the aws s3api command to download.

My process:

  1. Find the version id of the object / file you want to restore. You can do this via the AWS Console or using the aws s3api command. The following command will give you the version ids of every object in the bucket:
    aws s3api list-object-versions --bucket my-bucket
  2. Copy the version of the file you want from S3 to your computer:
    aws s3api get-object --bucket my-bucket --key path-to-file/my_file.tar.gz --version-id 12345ABFPhsFitffwuu9Q6iHOUtx0hID my_file.tar.gz
  3. Copy the file back to the bucket (aws s3 cp works fine here…)
    aws s3 cp ./my_file.tar.gz s3://my-bucket/path-to-file/